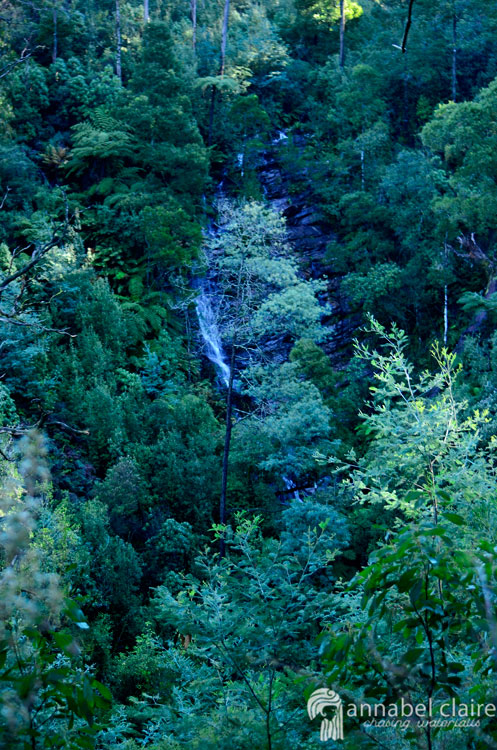
Wombelano Falls, Kinglake West, Melbourne – Victoria, Australia

A spontaneous trip.

After exploring Mason’s Falls in Kinglake National Park, my friends Scott and Roya were happy to continue exploring. I hadn’t even heard of Wombelano Falls at this point. I was instructed by Scott to get up Google and see if there were any falls nearby the area.

I scoffed at him, “If there were any falls, trust me, I’d know about them.”

Well, I ate my words when Wombelano Falls popped up on the search results. A mere 15 minutes away from Masons Falls in Kinglake, we decided to head that way.

Directions from Masons falls:

  • Head out of the Masons Falls carpark onto Masons Falls Road
  • Turn left onto National Park Road and follow this for 4kms
  • Turn right onto Whittlesea-Kinglake Road/C724
  • After 4.7kms turn left onto Extons Road and follow this for 3.9kms
  • Turn right onto Captains Creek Road, which is an unsealed, dirt road that cuts through farmland


Directions from Melbourne city:

  • Leave the CBD heading north towards Citylink ramp to State Route 43/Airport/Bendigo/Hume Hwy and follow this for 11kms (this is a partial toll road. Info on tolls in Melbourne can be found here)
  • Keep right at the fork to continue on Tullamarine Freeway/M2, follow signs for State Route 43/Melbourne Airport and follow for 3.5kms
  • Use the left two lanes to take exit 14 for M80 towards M31/Hume Freeway/Greensborough, keeping right at the fork and following this for 16kms
  • Use the left two lanes to turn left onto Plenty Road/State Route 27 (signs for State Route 27/Whittlesea) and continue for 9.2kms
  • Continue straight through the next seven roundabouts
  • After the last roundabout, continue for 13kms, turn right onto Whittlesea-Kinglake Rd/C724 and from here the directions are the same as above!
  • After 4.7kms turn left onto Extons Road and follow this for 3.9kms
  • Turn right onto Captains Creek Road, which is an unsealed, dirt road that cuts through farmland 

The ‘dirt road’ I’m referring to is fairly hectic, with lots of dips (half of the road was missing at times) and watery potholes. I was thankful we were in a 4wd.

The walk to Wombelano Falls is a circuit back to the carpark.

We began straight ahead, if not slightly to the right. Indicated by an orange arrow on a tree.

Speaking of trees, the surrounding forest was magical.

We were taken along a zig-zagging path, making its way down the hill.

I was in my Nike free runs – a poor choice for this day when the ground was still damp and muddy from recent rainfall (no, still not enough to fuel our waterfalls unfortunately).

In the middle of chatting to Roya about making camembert cheese-melt inside a loaf of bread (literally the best thing ever), I suddenly slipped, flailing my arms about and sliding with every stumbling step I made. Somehow, I managed to stay on my feet – just.

Scott and Roya were gasping, asking if I was okay. Meanwhile, I got a severe case of the giggles. We slowed and I crouched over in a fit of laughter. Finally, I calmed myself and took another step, but I slipped again – Scott grabbing my arm to steady me – and I lost it laughing again.

Moral of the story? Wear proper shoes. For some unknown reason I had chosen to leave my Kathmandu hiking shoes* at home. This wouldn’t have been such an issue if my Nike’s still had their soles, but they are so worn that they are flat and devoid of any grip. So basically, wear something with groves so you don’t end up like me.

*It’s here I should tell you that I am an affiliate for Kathmandu, so if you decide to purchase something from this link, I will receive some remuneration. Having said this, I absolutely love Kathmandu products and I wouldn’t endorse anything that I didn’t honestly believe in.

Once I had sorted out how to walk carefully downhill, we continued on. The ‘circuit’ is actually a halfway point on the track. So once you reach the platform, you have to head back up the way you came. You can then follow the path to the right, or go back towards the left.

Obviously, we continued further downhill towards the falls. Soon, we saw a trickle of water peaking through the lush greenery.

We continued closer, and found our way to the viewing platform. To my dismay, the viewing platform was quite a distance away from the falls, and the lack of decent rainfall had reduced their impressiveness.

It was difficult to get good shots from this distance. To the right of the viewing platform, a section of the wood left a gap that you could slip behind – if you were careful. What resembled a path then meandered down into the thick forest, though it was extremely steep.

Scott decided to venture down, becoming engulfed in the greenery. Roya and I could see glimpses of his blue jacket, until he disappeared.

“You coming?” he yelled.

I slid under the railing and started to head downhill. But the path was ridiculously steep – and we had already established I was in the complete wrong shoes for muddy terrain.

I took a few more steps, careful not to slip on the steep, tree-root invested path. I was not convinced it was a man-made path – it appeared to have been washed out with water and somehow created by nature. But I did want to get to the bottom of the falls.

A few more steps and I froze. I realised I was going to have to head back uphill. Afraid I wasn’t going to make it in my shoes – and with my level of fitness, might I add – I headed back up to the platform, where Roya was anxiously waiting.

Most of the time, I take risks when it comes to waterfalls. But that day I had to use my better judgement. I’ll just have to go back one day when I’m more prepared – geared up with my Kathmandu boots and backpack full of my portable charger, first-aid gear and plenty of water.

I snapped a few more shots while other adventurers came and went from the platform. Scott was no where to be seen, and Roya and I started to panic. What if something happened to him while he was down there? I imagined a broken leg, or worse. Not to mention the fact that he was our ride home.

“Cooooooweeeeee,” I cupped my hands around my mouth and called towards the forest below. No reply.

Passers-by asked us what we were doing. We laughed nervously, “Ah, our friend went down there and he’s disappeared.” We must have sounded like lunatics.

Then, through the green ferns, I spotted a flash of blue.

“Oi,” I yelled.

“Sup,” Scott replied. Roya and I breathed a sigh of relief. We had our ride home! Oh, yeah, and Scott was safe, so there was that.

“Did you get to the base of the falls?” I asked excitedly.

“Nah, but you can tell that you’d get there eventually.”

I vowed then that one day I would return to find it. So watch this space for updates!

We headed back up towards the carpark, through the green luminous ferns and towards an evening of camembert cheese-melt inside a loaf of bread. And yeah, it was yum.

Native fern in surrounding forest.

Quick Facts

Last visitJuly 2017
Best TimeJuly-September
Start / FinishWombelano Falls Carpark off Caption Creek Rd
Unsealed RoadsYes, rough condition with potholes, beware when wet 
Walking distance1.5km return circuit (no access to base via track) 
Time40 minutes – 1hr return circuit
DifficultyEasy 
FacilitiesNone 
Lat & Long37.4807° S, 145.3461° E
NearbyMasons Falls
WatercourseHirts Creek

Want to subscribe?

Never miss out on a waterfall chase by entering your email below!

Recent Posts

Find me on Facebook

Masons Falls, Kinglake National Park, Melbourne – Victoria, Australia

It was a Friday afternoon.

I had 0 plans for the weekend (I know, boring). Sitting at my desk at work, my eyes watering from staring at the computer screen, I waited for the clock to strike 5pm.

My phone was blinging with Facebook messages – friends asking what my weekend plans were. Then, somehow, the plans were made. We were headed to Masons Falls – just like that!

Saturday morning was cool, but sunny. My friend Roya arrived at my house and soon after our friend Scott knocked on the door. Luckily, Scott has a car, so after picking up warm coffees, we were on our way out of the city.

Driving directions (from Brunswick, north of Melbourne CBD) to Masons Falls Picnic area are as follows:

  • Leave the city via Brunswick Road/State Route 38 towards McKay Street
  • Turn right onto State Route 43/Citylink ramp to Bendigo/Airport/Hume Hwy (this is a partial toll road. If you’re unsure about toll roads in Melbourne, check here).
  • Keep right to continue onto Tullamarine Fwy/M2 and follow signs for State Route 43/Melbourne Airport
  • After 3.5kms use the left two lanes to take exit 14 for M80 towards M31/Hume Fwy/Greensborough
  • Keep right and follow signs for M80/M31/Greensborough for 16kms
  • Take exit 21 for Plenty Road towards State Route 27
  • Use the left two lanes to turn left onto Plenty Road/State Route 27 – follow signs for State Route 27/Whittlesea, follow this for 9kms
  • Continue straight through the next seven roundabouts (yes, seven!)
  • After the last roundabout, continue straight for 13kms, then turn right onto Whittlesea-Kinglake Road/C724
  • After 4kms turn right onto National Park Road
  • After 1.7kms turn right onto Masons Falls Road – which is quite a steep, downhill road (though it is sealed)
  • You’ll then reach the picnic area – turn left and left again (the carpark is one way) and you’re there!

Stepping out of the car at Kinglake, the air was significantly colder than the city.

Surrounded by tall, thin trees with the sun shining through, it was a beautiful spot to begin.

There is a big carpark area and plenty of facilities here including toilets, picnic tables and barbecues.

There’s also plenty of information about the history of the area and the wildlife. In 2009, menacing fires known as the Black Saturday fires ripped through this area, and the recovery process is still clear.

Which way to go? It’s pretty self-explanatory.

Always remember to be respectful of the wildlife.

And some rules and regulations exist at Kinglake:

The day we visited, fog clung to the ground, dispersing into the air. We shivered, passing the picnic tables and beginning on the path to the falls.

There are lots of other walking trails around the Kinglake area. We took the left trail to Masons Falls (obviously). If you’re interested in more trekking, there’s some info here.

The track to Mason’s Falls begins flat and muddy, so bring proper footwear. I had chosen my falling-to-pieces Nike free runs, which wasn’t the smartest decision I’ve ever made. My Kathmandu hiking boots* would have been a far better choice, though this path is relatively flat and easy, so you could get by with sneakers.

*It’s here I should tell you that I am an affiliate for Kathmandu, so if you decide to purchase something from this link, I will receive some remuneration. Having said this, I absolutely love Kathmandu products and I wouldn’t endorse anything that I didn’t honestly believe in.

And actually I managed with my Nikes in the end. Along the track you get a peak at the view, with huge undulating hills.

Large trees not yet recovered from the fire that ripped through the area reach tall into the sky.

After crossing a bridge, the track heads slightly uphill before reaching the amphitheatre-type viewing platform. Only 700 meters from the carpark, this walk is perfect for families and those who aren’t eager hikers.

The viewing platform pokes out over the hill and showcases Masons Falls.

Though we were quite a distance away, so these photos don’t do the falls justice. They plunged quite drastically into a hidden gorge below.

In addition to that, lack of recent rainfall meant that they weren’t as full and flowing as I’m sure they are during the wetter months. (This visit was in June on the cusp of July, prior to any significant rain). The below photo gives an indication of the distance between the platform and the falls.

I was playing with my zoom lens (a 55mm-300mm), which explains the closer shots. The sunlight was also posing a slight issue for long exposure shots. But we couldn’t complain about the glorious day we were experiencing.

There is also a lot of information about the falls and wildlife on the signs around the falls (pictured below) so take the time to soak it all in:

We decided to head back and explore the beginning of the stream that fuels Masons Falls. Back near the beginning of the track, a small bridge provides sneak peaks of this area. We had to climb off the track to get here, so take care if you plan on doing the same.

As you can see, the stream was quite dry. If it was in full flow, we may not have been able to stand here.

The sunlight trickled through the trees, sparkling on the little pools of water.

Much to my pleasure, this area gave me an opportunity to play around with some long exposure shots of the water that trickled among the ferns.

We spent some time here, where it was peaceful and pretty.

I set up my tripod and played around with a few angles while Scott and Roya stood and watched me patiently.

I always admire people who accompany me on my waterfall trips for being so patient. I have a tendency to be rather annoying when it comes to taking photos. But hey, it’s what I love.

I jumped down a rock-face a little further downstream and found this section, which was probably the best flowing in the whole area.

Finally, I put Scott and Roya out of their misery and decided it was time to leave. Though our adventure wasn’t over. Nearby Masons Falls (you can actually take the 9km trail there and back if you’re a budding hiker) is Sugarloaf.

We opted for being lazy, and drove up to Sugarloaf to see the view of Melbourne, which was pretty incredible. I would highly recommend doing this if you’re in the area.

After gazing at the view and snapping a few shots, we headed back to the car, munching on salt and vinegar crisps. It was still early, so we decided to head to the nearby Wombelano Falls (15 minutes further East). Head there with us!

Looking for other waterfall adventures in Melbourne, Victoria? Try Olinda Falls in the Dandenong Ranges!

Quick Facts

Last visitJuly 2017
Best TimeJuly-September after rainfall
Start / FinishMasons Falls Picnic Area
Unsealed RoadsNo
Walking distance700 meters one way
Time30 mins return
Difficulty Easy
FacilitiesToilets, Gas BBQs (solid fuel not permitted), Picnic Tables
Lat & Long37.4954° S, 145.2466° E
NearbyWombelano Falls, Sugarloaf
WatercourseRunning Creek

Want to subscribe?

Never miss out on a waterfall chase by entering your email below!

Recent Posts

Find me on Facebook

Snug Falls, Snug, South Hobart – Tasmania, Australia

It was my last day in Tasmania.

For a five day trip in June 2017, I had done pretty well. I visited ten waterfalls, made plenty of friends and drove well over 500kms. My trip was a true representation of ‘grabbing life by the balls’, for lack of a better expression.

My last day, I just had one final waterfall to see. And it was a special one, because I was meeting up with a fellow travel photographer that I’d formed a friendship with on Instagram, but never met in person.

It was a bit daunting, to be honest. Would we get along? Maybe she was a serial killer! (She wasn’t). Some friends I made at The Pickled Frog Backpackers (review in the footnotes of O’Grady Falls blog post), Amy and Catherine were coming along with me for the ride. They sat in the back seats, making me feel like a taxi driver. We’re not sure why, and we had a laugh about it about halfway through the drive.

We left Hobart, heading South towards where my Instagram friend, Casey (@the_meanderings) lived. After some nifty navigating from the backseat, we soon pulled up next to a quaint little homestead house. Casey came out to the car, and her mum waited at the end of the drive, clearly checking us out (probably to make sure WE weren’t serial killers)! Casey opened the door to the passenger seat and sat in. And we all got along instantly. Four smiling girls, we started our journey.

Driving directions to Snug Falls from Hobart are as follows (I actually poached this pretty much from Casey’s blog, because being a Tassie local, she knows the roads better than I do. Check out her blog full of amazing, well described stories and travels).

  • Leave Hobart heading south along the Southern Outlet (A6)
  • Stay in the right hand lane at the Kingston Bypass and continue on this
  • Take the 4th exit for the Channel Highway (B68) at the roundabout
  • Continue for 10km along the Highway until you reach the town of Snug
  • Turn right onto Snug Tier Rd, just after the “School Access Rd”
  • Follow this road for 4km and then turn onto Snug Falls Rd
  • There are spots for parking shortly before the trail head
Snug Falls from Hobart CBD, Google Maps (2017).

So, with driving directions from Casey the local, we headed along some dirt roads (though these roads were in great condition, and the unsealed road to Snug Falls is very good – at June 2017 – so it wasn’t a stressful drive).

We followed the signs for Snug Falls, which were well placed throughout the drive. The road to Snug Falls is a single lane, though there’s plenty of little side bays along the left hand side to aid if there’s oncoming traffic. Soon, we had to park in the widest section on the left (pictured below), which resembles a carpark, and walk a bit further along the road.

We kept to the left, afraid that cars would come whizzing by. But soon we found the start of the track.

The track may only be 2kms, but the steep descent ahead of us told us it wasn’t going to be the easiest thing we’d done. Having hiked every single day of my trip, I was hoping my legs would give me some mercy.

We chatted as we walked, bonding over travel stories from our various parts of the world (Amy from London, Catherine from Scotland, and Casey and I from different parts of Australia). There was a definite ease of companionship among our newly acquainted group.

The track was uneven, resembling cobbled concrete (perhaps a man-made path that has been eroded by extreme weather), and tree roots overtook the ground, making for a very uneven walk.

We crossed the first small bridge/walkway.

And had to duck under fallen trees.

Then cross another bridge…

We then hit a small clearing with a shelter. It had ‘The Pub” scratched into the wood. But we couldn’t work out what it was actually supposed to be for.

The path continued further downhill, so we had no choice but to persevere.

Soon we were engulfed in thick forest.

The end was visible, though it didn’t seem like a waterfall was anywhere in sight.

Down some final stairs…

The gorge suddenly opened up into a wide, beautiful clearing filled with luscious, green ferns, mossy rocks, and Snug Falls.

The above photo is taken from the opposite side of the gorge – note the stairs on the left hand side.

The falls weren’t flowing particularly strong, but are fuelled by a number of streams in the surrounding area. This means you’re likely to see them flowing no matter what time of the year you visit.

Having said that, I’ve seen some pretty hectic videos of what happens here during a wild storm with heavy rainfall, so make sure you plan ahead and check the recent rainfall. Tasmania can experience periods of drought, and then flash floods. In these cases, the waterfalls will run with a thick, brown water. It’s best to wait a few days/weeks until they run clear for a really beautiful experience, so do your research so you’re not disappointed.

In our case, the low water levels meant we could cross small sections of stream and curve our way around the mossy surroundings to get closer to the falls.

I loved this, because it meant I could experiment with different angles for photographs. The nice, sunny morning we were experiencing was beautiful, but it wasn’t being very forgiving when it came to taking photos.

So I had to compromise a little with long exposure shots. Though the moody, darker areas of shadow and fern were great in contrast.

Snug Falls is about a 25meter drop, which puts these images into perspective.

Some shots of the incredible, green surroundings:

It was wonderful to share my last Tassie waterfall experience with these three girls.

With rumbling tummy’s, we decided it was time to leave. Instead of leaving us to find something to eat around Snug, or heading back to Hobart, or using menu log (Uber eats isn’t in Hobart yet, so menu log was the next best thing. Please note, if you use this link I am entitled to remuneration from an affiliate program) to fill our hunger, Casey kindly invited us back to her house, where her lovely mother made us tea and lunch. We all sat around their dining table, talking intelligent conversation about travels, politics and life. It was a day I will never forget, and I look forward to crossing paths with these girls in our future travels.

Casey (@the_meanderings) and I all smiles at Snug Falls

And that’s a wrap! That’s all the waterfalls I visited in June 2017 in Tasmania. From O’Grady Falls to Silver Falls, then Russell Falls, Horseshoe Falls and Lady Barron Falls, to Myrtle Gully Falls and Secret Falls, Strickland Falls, the journey to Liffey Falls, and finally Snug Falls! There are over 200 waterfalls in Tasmania, so I’ve barely scraped the surface. Huge thank you to Waterfalls of Tasmania which helped me immensely and which shares my passion for waterfalls.

They say when you leave a place, you leave a little piece of your heart behind. Well, for me, Tassie got a whole damn chunk. And I will be back.

Quick Facts

Last visitJune 2017
Best TimeJuly-September after rainfall or snow melt 
Start / FinishSnug Falls Track from Snug Tiers Road
Unsealed RoadsYes, great condition
Walking distance2km return
Time1hr return 
DifficultyModerate
FacilitiesNone, Snug town nearby
Lat & Long43.0834° S, 147.2071° E
NearbyPelverata Falls (not yet featured on this site)
Watercourse Snug River

Want to subscribe?

Never miss out on a waterfall chase by entering your email below!

Recent Posts

Find me on Facebook

Liffey Falls, Liffey Falls Reserve – Tasmania, Australia

The journey of a lifetime.

Or so it felt. My trip to Liffey Falls is a story and a half – so buckle up! You’re in for a rough ride, just like I was.

It was probably stupid of me to choose such a big day trip to do alone. And yet, that’s exactly what I did.

Driving to Liffey Falls Reserve from Hobart is a three hour drive – one way (maps says 2hrs 45 minutes, but it is wrong) and roughly 50 minutes from Launceston. I did my research, and everything I found said that Liffey Falls were World Heritage listed and walking instructions said to begin from a carpark. I thought, you beauty, there’s a carpark and it’s obviously a high volume tourist attraction, so it’ll be easy to get to. So with as much research as I thought possible, I set out for six hours of driving.

Hobart to Liffey Falls Reserve, Google Maps (2017).

The thing about driving on Tassie roads is that they’re not always in the best condition. In fact, the majority of them aren’t. To make matters worse, I was driving a tiny little Kia which I hired from Drive Car Rental (review in the footnotes of Russell Falls blog post).

Heading out of the city was okay because I was on the main highway. Well, it was okay until the car was suddenly surrounded by a thick, white fog. My heart started to beat faster as the car in front of me gradually disappeared from sight. I’d never driven in fog before, and I could feel anxiety rearing its ugly head.

Almost as quickly as it arrived, it disappeared. I breathed a sigh of relief and continued on.

In-depth driving directions from Hobart are below: (skip this part if not applicable)

  • Leave Hobart CBD via Brisbane Street, turning left onto National Highway 1
  • Continue on National Highway 1 for 11kms, keeping to the right
  • At the round about, take the 2nd exit to stay on National Highway 1
  • Follow National Highway 1 for 1.3kms. You will come across three more roundabouts – follow all the signs that will keep you on National Highway 1
  • After the third roundabout, follow the highway for 25kms
  • Turn left onto Highland Lakes Rd/A5 (you have now left the main highway) and follow this for 66kms. This road is very windy, so be careful -take it slow if need be).
  • Turn right onto Poatina Rd/B51 and follow this for 46 kms. This road winds through the Great Western Tiers, and a segment is a particularly steep drive with ridiculous turns so take this slowly
  • You’ll reach the end of the road, with the only option to turn. Turn left onto Saundridge Rd/C515 and follow this for 4.3kms
  • Turn left onto Blackwood Creek Rd/C514 and follow for 14kms – to be able to continue on Blackwood Creek Rd for this long, you will need to turn right when you reach Hop Valley Rd (on the left). Maps doesn’t tell you to do this, so be on the alert. This turn is probably about 7kms after the initial turn onto Blackwood Creek Rd, and the part after turning is unsealed
  • Blackwood Creek Rd will eventually hit an end, where you will need to turn left onto Liffey Rd (also unsealed) and follow for 13kms (at some point this will turn into Gulf Road, which is a sealed road that runs through farmland)
  • Turn left onto Bogan Rd/C513 and follow this. At this point I had lost phone service, so maps were only going from memory of the initial route and at a fork in the road, there were clear signs for Liffey Falls, meanwhile maps were telling me to go the opposite way. I decided to follow the signs for Liffey Falls, which led along a very indecent unsealed road, recently (and often) washed out, with loose gravel, bumpy ribs and potholes. My entire car shook and toppled as I drove slowly over the risky road. Be sure to avoid as many potholes as you can, and take it slow
  • The forest here is thick, and the unsealed road winds around blind corners in almost a single lane, so care is key
  • Eventually, you’ll drive over a bridge, where Liffey River runs underneath and a very small area resembling a carpark is on the right
  • Drive past this, and further uphill and you’ll reach the Liffey Falls Reserve carpark. Finally!

The best thing about this drive was that I got to see every landscape possible. I drove through undulating hills, flat baron land, desert-type terrain with dramatic, bare trees and snow laying on both sides of the road, winding mountainous ranges with fresh springs dripping out of rock face, vibrant green farmland, and lush rainforest. I was enjoying the drive and every landscape it showcased.

It was only once I got to Blackwood Creek Rd that I started to panic. The unsealed road was rather bumpy, with loose stones, potholes and lots of dead wildlife. But that wasn’t even the half of it. Compared to what lay ahead of me, that first unsealed road was a soft pillow.

The roads leading to the Liffey Falls carpark were stony, with bumpy ribs and potholes everywhere in sight. My little Kia shook and tumbled over the road with a loud vibrate that filled my eardrums. I gripped the steering wheel, turning my knuckles white as I manoeuvred the car to avoid the dips and cracks from damaging my wheels, or worse.

The road was super thin, surrounded by rainforest, winding significantly uphill and curving around blind corners. I was thankful that there was a car in front of me I could follow. Never in my wildest imagination did I expect the drive to be like this – knowing that it was a World Heritage area highly visited by tourists had left me naive, underestimating Tassie’s untouched land and dodgy roads.

Finally, I reached a bridge (pictured in the above photo) so I got out and took a quick snap to calm my nerves (pictured below). I then continued further up the road, praying I was almost there.

I won’t lie to you. The whole drive I was freaking out. I had no mobile phone service. If I popped a tyre I was screwed. If I damaged the car I would lose my $250 bond, and potentially have to pay my excess.

My heart was racing a million miles an hour. I was questioning myself – why did I do this!? I considered giving up maybe five or six times. But I had come so far – I didn’t want it to be all for nothing.

Then again, I needed to allow enough time for the three hour drive back to Hobart if I wanted to make it back before dark. I pushed on.

Thankfully, less than 100m up the road, I found the carpark. Hallelujah!

I was beyond happy to have made it. The carpark was large, with plenty of facilities including shelters, picnic tables, bike racks, barbecues and toilets. Unfortunately, camping is not permitted.

There’s also a bonus feature – a ‘Big tree’!

I had parked the car and explored the area, my heart rate returning to normal. I was only slightly phased by the lack of phone service (I’m with Optus, and I had promised my Dad I would message him when I arrived safely, which I was unable to do and felt guilty about). But I had made it! That’s all that mattered.

There are plenty of signs at the beginning of the trail (which is back near the carpark entrance, not near big tree) so it’s obvious where to begin. They also provide plenty of information on Liffey and World Heritage sites.

I’ll let the below signs do the talking about what to expect along the trail. Despite the second sign, it’s relatively easy (especially in comparison to the drive).

I began the trail, nervous that coming all this way wasn’t going to be worth it.

The ferns led the way, lining the sides of the trail.

The initial walk is fairly flat, then begins a slight descent.

The ferns and surrounding rainforest were blooming and full of life. I felt instantly relaxed and comforted by the abundance of nature.

I think it’s so wonderful how being immersed in nature can so drastically alter your mood. For me, it’s the perfect cure.

The sun danced through the trees in the open parts, and ferns covered it beautifully in others. 

There are plenty of viewing platforms along the trail. The first is at the top of the first visible cascades.

The second is a little further along.

Between the two, I noticed a thin trail that resembled a path. It appeared it was meant to be there, though it looked worn and slippery. You know me – of course I went down.

It gave me a nice, clear view of some of the upper cascades.

If the fresh rainforest wasn’t enough to calm me down, the flowing water of the first cascades were the icing on the cake.

The water looked so fresh, clear and pure as it gushed down the rock face.

It was clear I wasn’t the only photographer to venture down here, though. I kind of liked that, seeing what was left behind and knowing we’ve all shared this space. Instead of impacting it negatively, we’ve left it in pristine condition.

Cobbled stones littered the river. I realised that where I was standing surely became submerged when there’s more rainfall and snow melt.

But in the recent dry conditions, it was a perfect spot to sit and take in the beauty of the falls and the quiet, pristine surroundings.

I could’ve sat there forever, but it was time to continue further, to find the ‘main falls’. I hoped there were some – I honestly had no idea what to expect.

The path follows the river, and the low water levels meant that I could meander down the bank and stand on some flat, rocky segments that weren’t covered by the river.

Honestly, the photos of this place don’t even do it justice. I was mesmerised.

And then I found more falls.

These were by far my favourite, as I watched the large lump of water cascade through a thin crack in the rocks, and project over the edge into a sudden cliff-drop.

Further along the track, these falls peeped through the lush green trees, right before another viewing platform.

This platform wasn’t actually the best place to see the falls, due to the forest cover. Standing on the mulchy bank a little bit before the platform actually provided a better view.

I had to be careful standing on the squishy bank, intertwined with tree roots. The last thing I needed to do was trip or slip down into the gorge. There would be no coming back from that.

Despite the presence of danger, the falls were incredibly beautiful. Illuminating over the edge and pooling on the rocks below, surrounded by moss and ferns. I spent a lot of time playing with camera settings and taking photographs. I loved them all.

The view of the platform I mentioned before:

The path here continues to an apparent ‘lower carpark’ – who knows how to get there! Not me. Haha.

EDIT: I’ve actually since been informed that if I followed this path for another 5 minutes I would have arrived at the actual main falls! Turns out in my hurry to get back to Hobart, I missed the most beautiful part of this track. But not to worry – it just means I’ll have to go back!

I was just as terrified to leave Liffey as I was during my arrival. But it had to be done. I drove back the way I had come (not that there was another way), hitting a fork in the road and freaking out while I momentarily forgot which way I had come from. I figured following the signs for ‘Tourist Route’ couldn’t go wrong.

My instincts were right. I made it back home safe and sound. (‘Home’ was The Pickled Frog Backpackers, a review is in the footnotes of the O’Grady’s Falls blogpost, if you’re more of a hotel person try hotels.com for comparison prices).

At the end of it all, I was so stoked to have made it! And I was happy to have a story to tell and to have endured the journey. Because after all, this is what I love, and this is part of the reason why I do what I do. When I did my research, I couldn’t find anywhere that told me the trip to Liffey Falls was going to be like that. So now, I can share my story for others like me who want to know exactly what to expect and exactly how to do it.

To those people, whoever you may be, happy waterfall hunting! Stay safe,

xo,

Me

Quick Facts

Last visitJune 2017
Best TimeJuly-October 
Start / FinishLiffey Falls Carpark 
Unsealed RoadsYes, often in horrendous condition, lots of potholes, wet and bumpy, ribbed, 6kms of narrow winding
Walking distance2km return
Time50 minutes return
DifficultyModerate
FacilitiesToilets, Barbecues, Picnic Tables
Lat & Long41.6982° S, 146.7643° E
NearbyClosest town is Launceston
WatercourseLiffey River, many cascades

Want to subscribe?

Never miss out on a waterfall chase by entering your email below!

Recent Posts

Find me on Facebook

Moody blue image of Strickland Falls taken during a chasing waterfalls trip to Hobart Tasmania

Strickland Falls, Mt Wellington Park, Hobart – Tasmania, Australia

Moody blue image of Strickland Falls taken during a chasing waterfalls trip to Hobart Tasmania

A photographer’s dream.

There is often some confusion about the location of Strickland Falls. This is because they can be passed on a path that continues from O’Grady Falls called the Rivulet Fire Trail.

Out of sheer chance, two days prior I had chosen not to visit Strickland Falls that way, and instead turned to trek to Silver Falls from O’Grady Falls. And I’m so glad I did that, because when I ventured out to find Myrtle Gully Falls and Secret Falls in my little Kia (hired from Drive Car Rental – see footnotes in Russell Falls blog post for a review), Strickland Falls were another easy drive away.

From Hobart CBD it’s roughly only 11 minutes away. (I drove from Myrtle Gully Falls, but I’ve done the directions from my accommodation at The Pickled Frog Backpackers in the CBD, review in the footnotes of O’Grady Falls blog post. If you’re more of a hotel person, try hotels.com for comparison prices – they’re ace.)

Strickland Falls from The Pickled Frog Backpackers, Hobart CBD, Google Maps. (2017).

Driving directions are as follows:

  • Leave the CBD by travelling South-East, along Barrack Street
  • Use any lane to turn right from Barrack Street onto Davey St/A6
  • Continue straight on Davey Street, it will turn into Davey Street B/64
  • After about 700 meters, continue straight through the roundabout
  • After 4.5kms, turn right onto Strickland Ave
  • Follow this as it turns gradually around a bend
  • You’ll then see the clearing off to the left of the road, right before a severe horseshoe-bend in the road. This is where you should pull over, as seen in the above and below photos. You’ll be parked right next to the drainpipe

From here, it’s a short walk further into the foliage to follow the stream up to Strickland Falls. Just be mindful that these falls are located on PRIVATE PROPERTY, so make sure to be respectful in your visit.

I was quiet and slow, wondering if I was actually in the right place at this point. The main falls are not visible from the road, and I had to climb my way along the stream.

Old, rusted drain pipes lay in the small cascades. Lodged between rocks, water gushed through them and made for excellent photography practice.

These drains are remnants of old water catchment facilities, because a lot of drinking water is collected from Mt Wellington for the residents of Hobart.

Continuing further up the stream, I had to wrestle my way across wobbly rocks, trying not to lose my camera bag or backpack in the process.

I crossed a small section of the stream, and followed it further up towards the main falls, capturing some small cascades along the way (using my tripod, FYI).

Big fallen trees lay thick with bright green moss, tangled and twined into the stream.

The main falls were stunning. I guess I don’t need to tell you that, since you can see for yourself. But the thick forest cover makes for ideal lighting for photographs of Strickland Falls. I was lucky to play with a shutter speed of 30″ – the longest my camera allows me to go.

There’s me being blurry because I can’t stand completely still for 30 seconds haha.

I desperately wanted to stand on top of these falls – the top looked relatively flat from a distance. My eyes scanned the scene and I spotted it – a few stony ledges along the right-hand side in the below photograph.

It’s not pictured here, but along the right side of the bank is a squishy, mossy ground that wasn’t covered with water. So, I curved my way around it and begun the (careful) climb up the rocks on the right-hand side. My hands froze when they gripped the cold, mossy rock. But I made it up!

I just had no idea how I was going to get down… I was also on my own for this trip, so I managed the above shot of me by using the time lapse setting on my camera, having absolutely no idea whether or not the photograph had been captured. I prayed that it had – because there was no way I was climbing back up there if and when I got down.

Which I did, get down. Obviously.

I also played with my shutter speed settings in order to capture some shots without the blue tinges to them. I’ll let you decide which you prefer.

The blue ones remind me of unicorns and magic. S’all I’m sayin’.

Strickland Falls surprised and enchanted me, and I’ve even seen photos of people swimming here in summer (my visit was in June, on the brink of winter). So that just gives me an excuse to go back.

Want to visit other falls around Mt Wellington close to these ones?

Try Myrtle Gully Falls and Secret Falls, or O’Grady Falls and Silver Falls.

Quick Facts

Last visitJune 2017
Best TimeJune- November
Start / FinishStrickland Avenue
Unsealed Roads No
Walking distance 300meters
Time 5minutes
DifficultyEasy, some crossing of river 
FacilitiesNone, town 11minutes away
Lat & Long42.9081° S, 147.2620° E
NearbyMyrtle Gully Falls, Secret Falls, O’Grady Falls, Silver Falls
Watercourse Hobart Rivulet

Want to subscribe?

Never miss out on a waterfall chase by entering your email below!

Recent Posts

Find me on Facebook