Beauchamp Falls visited during Chasing Waterfalls trip in Lorne

Beauchamp Falls, Beech Forest, Great Otway National Park, Apollo Bay – Victoria, Australia

Beauchamp Falls are a well known beauty of the Great Otways. Tucked away about 41kms inland from Apollo Bay, Beauchamp Falls tumble about 20 meters. The water gushes over a lush fern cliff and into the Deppeler Creek below.  

Beauchamp Falls visited during Chasing Waterfalls trip in Lorne

I was very excited to visit Beauchamp Falls. They’d been a bucket-list item for quite some time. I began my journey from an Airbnb in Skenes Creek; an extremely windy 45 minute journey along Turtons Track. After bumping along on unsealed roads in the Beech forest, I made it. 

I didn’t realise Beauchamp Falls allowed camping until I arrived. I thought that was pretty cool. The camping clearing is at the end of Beauchamp Falls Road. Click here for information on camping here. (Though I disagree with their distance and time for the waterfall). 

The track for Beauchamp Falls begins to the left of the carpark.

Take the time to read the walk’s information sign at the beginning.

I always love looking out for the unique wildlife. Sadly, I never seem to see them. But that doesn’t mean they’re not there!

The walk begins as a gradual descent. The path is flat and easy at this point. I didn’t need the below sign to tell me to take my time. With such beautiful surroundings, it’s natural to take it slow.

For example, the ferns foliage provide a beautiful composition. 

I also love looking up when on a hike. Often it’s easy to forget. But the trees stretch into the sky, beautiful and out of reach.

X marks the spot. I assume this is to indicate you’re heading in the right direction. 

However, since Beauchamp Falls are quite touristy, they are well sign posted.

But that doesn’t mean it’s 100% safe. Nature is powerful and trees can collapse at any time. The below photo is a tame example, but a good reminder to take care.

I also love to indulge in the rich history of these places. Imagine being the first people to discover a place like this.

More amazing products of nature…

Soon the track will begin to follow the river-bank. 

Everything was very wet and tropical during my visit. September is a great time, since it’s no longer winter. However it’s still wet enough to experience an impressive flow of the falls.

The flat, stoney gravel track to Beauchamp Falls was easy to walk on. I did the walk in my Hunter gumboots, but it could easily be done in sandshoes.

I then reached a small bridge. It was covered in metal mesh to prevent slipping, so I crossed with ease.

Here the track continues as a boardwalk. 

It then heads up some stairs.

And evens out along another boardwalk. 

One last walk through the towering ferns…

Then the real descent begins. 

A whopping staircase winds it’s way down towards the river.

After the seemingly endless descent, a quick few upwards staircases lead you to the viewing platform.

I had finally made it! I felt an overwhelming sense of happiness and achievement. It happens when you’ve bucket-listed something for as long as I had Beauchamp Falls. 

Though there’s no access to their base, the platform provides a great view. 

It just wasn’t great enough for me. I headed back down the last few staircases to the point where they began. Here, there was a muddy path leading down to the river. 

I ducked under the metal railing and slid slowly towards the bank. It was obvious I wasn’t the first photographer to do this. I feel somewhat ethically torn when it comes to this. A lack of access to the base of Beauchamp Falls is there to preserve it. To prevent erosion and human devastation. But won’t nature do it’s thing regardless? One day these falls won’t exist to admire, so we have to take the opportunities while we can. 

That being said, I took extreme care when walking around the bank. I don’t want my presence to impact the beauty of this place. 

I waded carefully into the river for this shot. I remember the cold water gushing into my gumboots as if it were yesterday. I stood, the spray from the falls whisking into my face. All the while I was praying that my camera didn’t fall off the tripod and plunge into the water. But it didn’t.

Beauchamp Falls inspired me. They altered something in me. All waterfalls are beautiful to me, but some just have an extra bit of magic. 

It’s the feeling of zazz, of overwhelming joy, that I seek when visiting waterfalls. And Beauchamp provided the goods.

It wasn’t all sunshines and rainbows, though. The looming ascent was still ahead of me. Safe to say I was gasping for air once I returned to the car. But after a short recovery, I was headed to Hopetoun Falls – click here to head there with me!

Quick Facts

Last visitSeptember 2017
Best TimeJune-September (but flow year-round)
Start / FinishBeauchamp Falls Rd Camping Area/Carpark
Unsealed RoadsYes, average condition but could be managed in a 2WD
Walking distance 2.5km return
Time 1.5hrs return
DifficultyModerate, short steep hills on way up
FacilitiesCamping available, Drop Toilets
Lat & Long38.6469° S, 143.6119° E
NearbyHopetoun Falls, Triplet Falls, Little Aire Falls
WatercourseDeppeler Creek

Want to subscribe?

Never miss out on a waterfall chase by entering your email below!

Recent Posts

Find me on Facebook

O’Grady Falls, Mt Wellington Park, Hobart – Tasmania, Australia

It all started when I couldn’t find my suitcase.

I was supposed to be boarding my flight to Tasmania the next morning at 8am, so when I got out of bed on Saturday morning the first thing I did was go out to the shed (I always dread going out to the shed, you know, there’s spiders!) to get my suitcase.

However, when I finally slid the metal latch across with a screech and checked the spider invested shed, my suitcase was nowhere to be found.

Ah, I know! I must have left it up in one of my housemate’s cupboards, where my large case was. (My room has no storage whatsoever). That’s what I had done – brought it inside so I never had to visit the deathly spider room ever again. Clever me.

So I grabbed the step ladder and waddled to my housemate’s room, holding the ladder in front of me and trying to avoid banging the metal against my shins. I searched high and low in both rooms, becoming frantic by the second. But it was no use. The suitcase was not. In the house.

At first I thought I was going mad. Suitcases don’t just disappear! There was no logical explanation. No one else was home, so I quickly messaged my housemates while I was flying out the door to meet a friend for coffee. One of them replied, suggesting maybe I had put the small case inside the larger case I owned, and it was like a light-bulb moment. Of course! What a smart cookie. That’s exactly what I had done – and completely forgotten about it. I relaxed, convinced that when I got home my case would be ready and waiting for me.

I climbed to the top of the step ladder and skilfully slid the huge case (which weighs about 8kg without anything in it! Hence, I wasn’t taking that one) to the ground. I unzipped it quickly and flicked it open only to find – nothing! Fuck.

My heart sunk in my chest. It was almost 3pm. I had no suitcase of the right size and weight (Jetstar flights, always a killer) and I was freaking out. I “phoned a friend” in a panic, and managed to sort out borrowing her perfectly sized suitcase, which cost me a $4 bus trip and a $6 Uber to get back to my house so I could finally pack.

Anyway, everything was fine in the end. Really this is just a long winded story to teach you the lesson I learned – always locate your belongings FAR earlier than the day before your trip.

Anyway, after a whirlwind, I found myself in Hobart, Tasmania. And after a quick 20min shuttle bus to the Hobart Transit Centre, I was all checked in to The Pickled Frog Backpackers and ready to begin my adventures.

The Pickled Frog was by far the best hostel I’ve ever stayed in, and probably the best I ever will stay in (I know what you’re thinking, how could you possibly know that, Annabel? You’ve not yet experienced the others your future holds! But trust me, I just know). A longer review of this place can be found in the footnotes, and then you’ll understand. (If you’re not a hostel person and prefer a hotel, try hotels.com for comparison prices).

One thing I will say about this hostel is that it had a few free perks. On Mondays and Wednesdays, they took free shuttles up to the top of Mt Wellington to see the view. I signed up as soon as I arrived on Sunday, figuring I would go waterfall exploring after the free 15-20 minute drive to the summit.

Halfway up (at least I think it was halfway up, who knows) we stopped to observe (and collect) water from one of the many natural springs in Tasmania. Fun Fact: Mt Wellington’s fresh water is used for the majority of the drinking water in Hobart, and for Cascades beer by Cascade Brewery, Australia’s oldest brewery established in 1824.

We had the choice to get out at a stop along the mountain and walk the two or so hours to the top, but I decided to continue on the shuttle and see the views first. Also, at times the road we were on, Pinnacle Road, is closed due to weather such as snow (when the weather is good, you can follow this road all the way to the summit), so always check before you venture out.

Mt Wellington Park, contrary to popular belief, is actually not a National Park. Part of the land is privately owned and therefore cannot be registered as a National Park. The area of Mt Wellington Park is, according to the Wellington Park website, 18 250 hectares in size. (A hectare is defined as each 10,000m squared). The mountain itself is 1271m (4166 ft) at its highest peak, and is only Tasmania’s 49th tallest mountain. But the views are still on point.

There’s plenty of boardwalks so that you can see the view from different angles, as well as a sheltered glass lookout to protect you from the wind. Did I mention the wind was absolutely howling and freezing cold? You’ll 100% need warm clothes, gloves and a beanie at the top of Mt Wellington. I couldn’t handle the cold, vicious wind.

Some people chose to begin the walk back down the mountain, which apparently takes around three or so hours, seven if you want to walk all the way back to Hobart city. However, I opted to get the shuttle to drop me closer to the waterfall trails I was interested in this day.

The view from The Pickled Frog shuttle bus window.

Now, there are plenty of waterfalls on Mt Wellington, and lots of hiking trails. I won’t try to cover them all. But before I begin I will start by saying that Tasmania actually have some great tourist websites that will help you out. Check out Discover Tasmania and Wellington Park if you’re interested in more detail.

And last, but not least, they actually have an incredible waterfall guide, which is what I aspire to be (only better, hehe) which can be found at Waterfalls of Tasmania. Not a lot of places have something like this, and their interactive map is a godsend.

Anyway, I got dropped on a bend on Pinnacle Road, where the North-South track, Shoobridge Track and Circle Track can all be accessed from a close distance apart. Also, no driving on unsealed roads to get to Mt Wellington so that’s a plus. Refer to the map below.

Pinnacle Road, Google Maps. (2017).

Being dropped was probably ideal in this instance, because if you’re driving, the nearest place to park would be The Springs (where you can also access the North-South track, but you’d add a significant distance to your hike (see maps below).

O’Grady Falls in relation to The Springs carpark, Google Maps. (2017).
North-South Track from The Springs Road carpark to Pinnacle Road, Google Maps. (2017).

Anyway, I was lucky enough to be dropped. So here are some images of where I began. You can see the North-South track veers off to the left:

The Shoobridge Track is marked directly ahead, but also veers off to the left (Shoobridge and North-South do actually intersect a little further up):

Here you can see North-South Track in the far left corner, and Shoobridge heading off in front:

Then I turned to face downhill, towards the road. There appeared to be another track, but it’s actually just a little path that pops out onto the road. Head this way.

The track that you need in order to reach O’Grady falls from here is the Circle Track, which is a little further down the road. Be mindful of cars coming down the mountain at lightning speed (they’re nuts) as you walk.

You’ll then reach the Circle Track. Which as you can see from the sign, is 30 minutes one way to O’Grady Falls via the Betts Vale Track.

The walk was stunning. The air was crisp, and had a sharp bite to it, but walking made me warm enough almost instantly.

The earth wasn’t wet and muddy because there hadn’t been much rain when I went, but it was claddy and soft. Walking was relatively easy.

I came across my first bridge walk-way, which is always a good sign. A sign that the track is well travelled and in-tact, especially when you’re alone, is a good thing.

Shortly you’ll reach a thin wooden stump, with a path off to the right. If you continue straight, you’ll stay on the Circle Track. Turning right and heading further downhill leads you on to the Betts Vale Track. The below photo was taken once I had descended onto the Betts Vale Track and looked behind me to the sign.

I continued on. It’s worth mentioning that I actually did have phone service while I was in Mt Wellington (and I’m with Optus! I know! Shock horror!), but that’s probably because the mountain is only 17km or so from the city. I wasn’t worried about my battery dying either, as I had come prepared and bought myself a good quality portable charger. So I felt quite safe on my own, much more together than when I was frantically searching for my suitcase (har, har).

Further along the track, the path is very thin and windy, weaving its way through broken, mossy logs and around rocks. Take care when walking, and watch your step. Even in my Kathmandu hiking boots (my saviours)*, a rock or tree root could come out of nowhere.

*It’s here I should tell you that I am an affiliate for Kathmandu, so if you decide to purchase something from this link, I will receive some remuneration. Having said this, I absolutely love Kathmandu products and I wouldn’t endorse anything that I didn’t honestly believe in.

I reached another bridge. I love bridges on hikes, I feel they are so photogenic.

And then another! I began to name this trail ‘The Trail of Bridges’.

My photos may seem dark and moody, and that’s because it was. But don’t forget to look up, too.

Guess what? Another cute bridge!

As you can see, I don’t mind stopping frequently to admire the surroundings. Which I highly recommend doing. After all, it’s all about the journey, not the destination, right?

For me it’s about both.

After the final bridge – that’s five, I think there were five – you’re not far off from the falls.

The path turns man-made like, and maybe once it was. A pure concrete, eroded slowly but surely by the fierce conditions the mountain endures at times.

After the concrete-like path ends, you’re seconds away from a sneak-peak at the falls.

Excitement filled me as I caught a glimpse of the water, and saw yet another bridge.

If you’re curious, the warning sign says the “bridge maximum is 1 adult and 2 children.” It’s long and skinny, so I guess that makes sense. But it provides a great front-on view of these falls, shown in the cover photo of this blog post.

I was delighted to see the falls were actually flowing. I was worried that the lack of rain had dried them up, but luckily the mountain has plenty of rivers and streams that keep some of the waterfalls flowing year-round.

And the lesser water allowed me to venture down the bank, which wasn’t slimy or difficult, and stand in the shallow water (again, my Kathmandu water-proof hiking boots were my saviour, seriously, you should get some! I love them to death).

And if you can’t already tell, I finally got myself a tripod! I know! Wohoo! It’s been a long time coming. This was my first time using a tripod for my waterfall shots, and I could already feel the difference.

I have a light, three-length setting tripod and captured these shots using the Shutter Priority setting on my Nikon D5100 (indicated by an ‘S’ on the setting dial), which allows me to manually choose the shutter speed and lets the camera choose the rest. I set my ISO on the base setting for my camera, which was an ISO of 100, and played around with shutter speeds below 1/4 of a second. The camera decides the aperture.

I also had the task of getting photographs of me near the waterfall without any help. But don’t worry, unlike when I visited Olinda Falls in the Dandenong Ranges, Victoria, I didn’t almost lose my camera. I had the tripod, and I figured out how to use time lapse, which is a feature on my camera that allows me to set the time I want a photo to be taken, the time between the next photo, and how many photos to take. So with some trial and error – there I was! Don’t need nobody else after all, hehe.

O’Grady Falls were gorgeous, and I spent quite a bit of time playing around with my camera since it was my first Tasmanian waterfall. However, after a while I was ready to move on.

The Betts Vale Track continues after the thin bridge, passing the Woods Track (deviating off to the right and back up the mountain) before reaching a fork in the road between the Rivulet Track (on the left) and the O’Grady Falls Track (the right). Either way will eventually lead you to Huon Road, where you can catch a public bus back into Hobart. However, if you choose the Rivulet Track, you will pass Strickland Falls (though they’re not accessible from the track, I’m fairly sure you can spot them through the trees).

O’Grady Falls (Red Marker) in relation to Silver Falls and Strickland Falls, Google Maps. (2017).

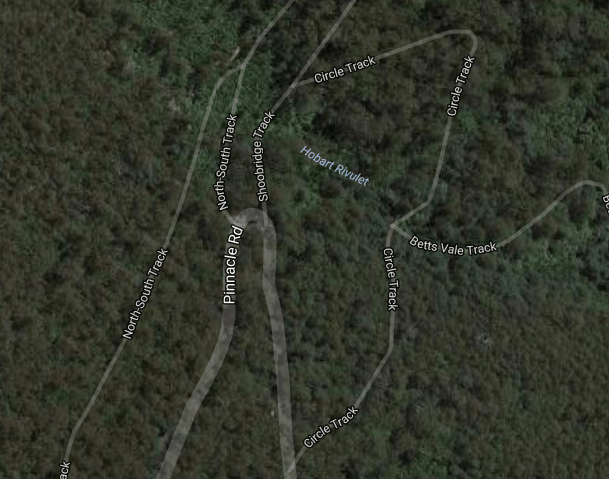
I, however, had been told by my shuttle bus driver that Strickland Falls were not worth the trip (which he was incorrect about, and a blog post will be coming soon to tell you just how wrong he was!), so I opted to turn back and tackle the Woods Track to find Silver Falls. Click to head to the blog post!

Oh, and if you’ve made it this far CONGRATULATIONS! You get to know what happened to my suitcase!! So, a couple months back I lived with two girls who were moving out, and two new girls were moving in. There was a little period over Easter where their rooms were empty and I was heading to Perth for the weekend, so I had gotten out the small suitcase for a quick trip. Then I decided I wanted to take the big case and bring some of my things from Perth back to Melbourne with me. The new girls moving in had told me that I could store some of my stuff in their cupboards because I didn’t have any storage in my room, so I put the suitcase in one of their cupboards and left for Perth, forgetting to tell anyone what I had done. Therefore, when one of the girls who was leaving was clearing out the rest of her stuff, her and her parents mistook the suitcase for their own and took it with them. Voila! Mystery solved. LOL.

Footnote

The Pickled Frog Backpackers

This was the coolest backpackers I’ve ever stayed in. Unlike the usual crammed, dingy places you endure at the likes of Nomads and STA Travel, ‘The Frog’ as people called it was unique and welcoming. I guess you expect the lowest of the low when you stay at a hostel, so I guess that’s why most people are pleasantly surprised. But it’s more than that.

First there was the ease of getting there – located in Hobart CBD on Liverpool street, and a short walk from the Hobart Transit Centre, airport buses all but drop you right on the doorstep.

The building itself is large and two-story, though it’s not overly difficult to lift your suitcase or pack up the two short flights of stairs. When you enter The Frog, drawings from guests-gone-by cover the right wall – any variation of frog you can think of, it’s there.

To the left and centre there’s some cosy couches, and a hammock in the corner. A wood fireplace warms the room with a crackle. Straight ahead you find the bar, where you can purchase a $20 beer card which gets you 5 beers (or cider, or any drink really) if it’s worth $5 or less (which a lot of them are). If you haven’t already done the math – that means you get one drink for free! Awesome.

The staff are friendly and approachable, full of jokes, laughter and accurate information about where to go and what to do. I handed over my $10 key bond (which you get back if you return your key) and was told I could leave my things in the storage until my room was ready (I arrived quite early, around 9am). A huge boot hangs from a string with a key to the luggage storage if you need a place to keep your things before or after you check in/out like I did. In the back area there’s more couches, booths, a t.v. with plenty of movies, the kitchen and a pool table.

I stayed in a 6-bed female dorm which was spacious enough for all of our things and still had some floor space. Upstairs, graffiti-like artwork covers the walls and makes the place feel groovy and funky. There are four showers and three toilet stalls in the bathrooms (seperate male and female), the condition was fine.

But it wasn’t all about the facilities at The Frog. It was about the people, the culture. It felt like a huge frat house, though not everyone was crazy party animals, and if they were they didn’t get in-your-face about it. Being a family-owned and run hostel, The Pickled Frog had such homey feel to it, and you were guaranteed to make friends that you’ll probably keep for life if you continue on your travels. I will recommend it to anyone who will listen!

https://www.thepickledfrog.com

Quick Facts

Last visit June 2017
Best TimeJune-September
Start / FinishCircle Track, Pinnacle Road
Unsealed Roads No
Walking distance 2.5km return 
Time 2hrs return
Difficulty Moderate
Facilities None
Lat & Long 42.9101° S, 147.2537° E
NearbyStrickland Falls, Silver Falls
Watercourse Hobart Rivulet

Want to subscribe?

Never miss out on a waterfall chase by entering your email below!

Recent Posts

Find me on Facebook

Huka Falls, Lake Taupo – North Island, New Zealand

In the beautiful North Island of New Zealand, Lake Taupo is drained by the monstrous Huka Falls of turquoise and crystal blues, gushing past at incredible speeds…

Notorious for it’s beautiful landscape (and if you forget about the Earthquakes), New Zealand is a must-visit home to some beautiful waterfalls.

If you’re headed to the North Island of NZ, you have to visit the incredible Huka falls (pronounced Hooka, unlike the legendary Hukka performed as New Zealand traditional dancing). Just thought I’d mention that one.

I got to experience the Huka falls while being thrown around on a jiggling Contiki bus (since the road to them is thin and windy). We were stopping at Lake Taupo for the night and swung by the falls on the way. But if you don’t have the luxury of being on tour – they aren’t too hard to find. Simply follow the signs; or refer to the maps below.

New Zealand North Island, Lake Taupo. Google Maps (2016).
Huka Falls, Lake Taupo New Zealand. Google Maps (2016).
Huka Falls Road Map. Google Maps (2016).

When we arrived at the falls, I stepped off the bus into a chilly, breezy air and could immediately hear the rush of water. The carpark is situated right next to the falls and the bridge in the above cover photo, so they’re not difficult to get to by any means.

I rushed eagerly towards the foot bridge and got my first glimpse of the Huka falls. The falls are so powerful, with gushing water rushing past ferociously below. Seemingly, the falls are not coherently dropping downwards, like most waterfalls do. At least the don’t seem to…. In an odd way, they seem to be kind of flat… But, of course, that’s not the case.

The stone bridge built across them makes it seem like a fast-moving river (we soon learned 220,000 litres-per-second), but if you venture to the second viewing platform, another 600m or so down the track, you can see where the falls drop down and become the Waikato River.

I stood, mesmerised by the bright turquoise colour of the falls. Plenty of waterfalls show white froth and clear water, revealing the rock behind them. But this, this was something else. The copious amount of water in these falls creates the most incredible blues. It is a great spot to stare and ponder your insignificant size and power in relation to parts of nature. I had to giggle at that.

You’d never be able to swim in these falls, unfortunately. However, you can go on ‘speed boat rides’ down parts of them and into the river that flows onwards – get in touch with Huka Falls Jet if you’re keen! But for me, simply standing and gazing was more than enough.

Quick Facts

Last visit June 2016
Best Time Year-round
Start / Finish Huka Falls Carpark
Unsealed Roads No
Walking distance 100m
Time 2mins
Difficulty Super Easy
Facilities Toilets
Lat & Long 38.6486° S, 176.0900° E
Nearby Lake Taupo, Lake Taupo Bungy
Watercourse Waikato River

Want to subscribe?

Never miss out on a waterfall chase by entering your email below!

Recent Posts

Find me on Facebook